nestjs
ts
nestjs
- Nestjs는 효율적이고 스케일링이 쉬운 nodejs 서버를 만드는데 사용하는 프레임워크이다.
- 차세대 Javascript를 사용하며 Typescript로 만들어졌으며 Typescript를 완전히 지원한다.
- Nestjs는 Express 같은 견고한 HTTP 서버 프레임워크를 사용하고 있으며 원한다면 Fastify를 대신 사용할 수 있다.
- 상당히 많은 Nodejs 라이브러리, 헬퍼, 툴들이 있음에도 불구하고 아키텍처 설계에 대한 문제를 해결해주는 해결책은 존재하지 않는다.
- Nestjs는 자체적으로 서버 아키텍쳐를 제공해준다. 그래서 테스트하기 쉽고, 디커플링이 잘 되어있고, 유지보수가 편한 서버를 제작하게 해준다.
Nestjs LifeCycle
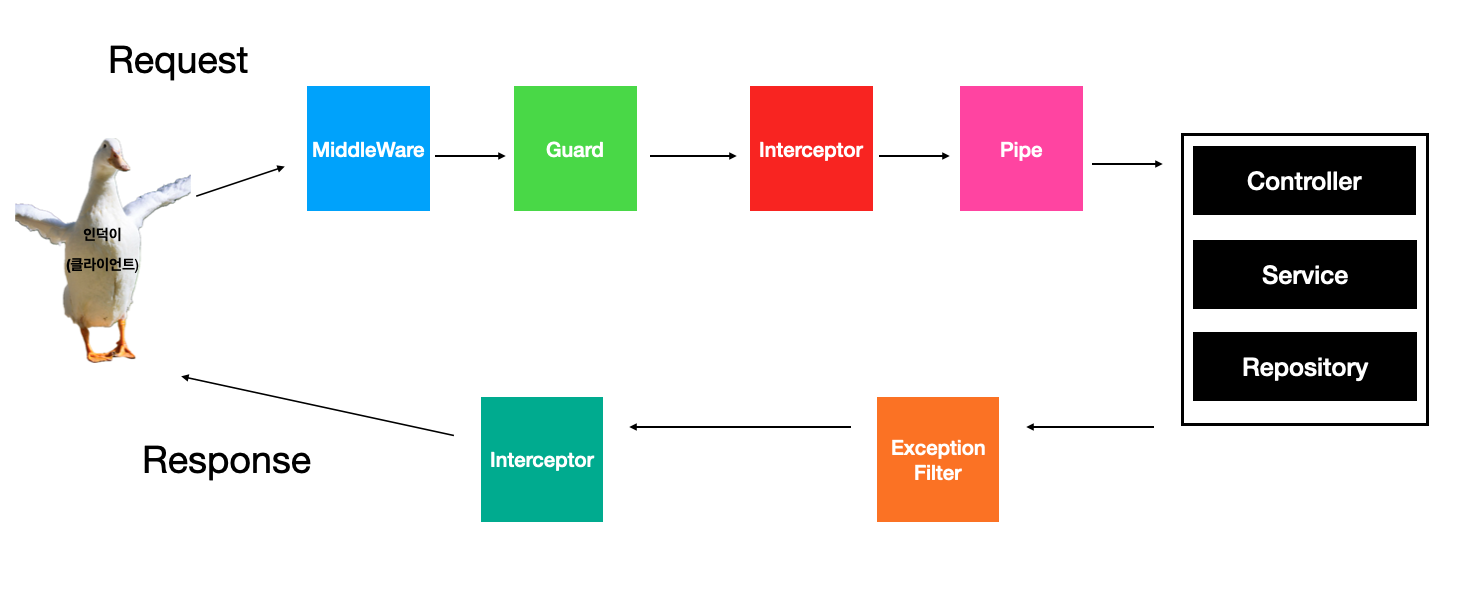
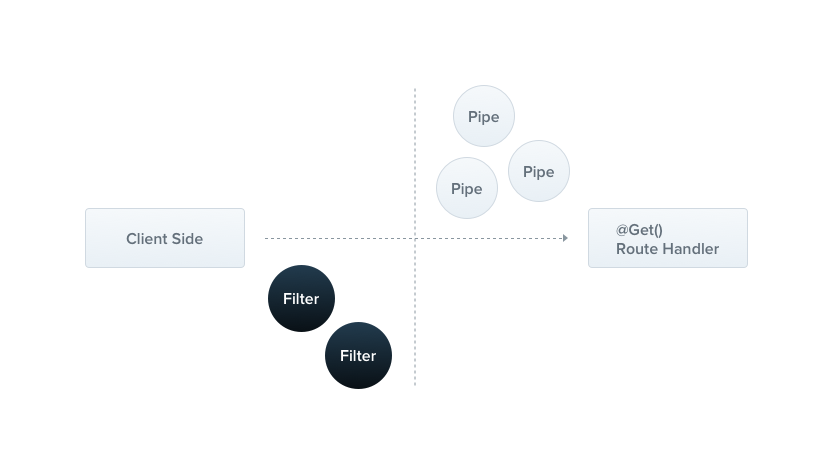
Pipe
- Pipe는 Injectable 데코레이터로 데코레이팅 되어있고, PipeTransform이라는 인터페이스를 implement한다.
- 변형: 원하는 형태로 변형시켜준다 ex) string => integer
- 검증: 만약에 유효한 데이터면 그대로 전달해주고 아닐 경우에는 에러를 던진다.
코드예시
test.pipe.ts

import {
    ArgumentMetadata,
    BadRequestException,
    Injectable,
    PipeTransform,
} from '@nestjs/common';

@Injectable()
export class TestPipe implements PipeTransform {
    transform(value: any, metadata: ArgumentMetadata) {
        if (value.content.toString().length > 10) {
            throw new BadRequestException(
                'content는 10자 미만으로 작성해주세요',
            );
        }
        return value.toString();
    }
}
app.controller.ts
@Controller()
export class AppController {
constructor(private readonly appService: AppService) {}
@Get()
@UsePipes(TestPipe)
getHello(@Body() body: Ibody): string {
console.log(body);
return '성공';
}
}결과
“message”: “content는 10자 미만으로 작성해주세요”,
“error”: “Bad Request”,
“statusCode”: 400
Guard
- Guard는 쉽게 말하면 보호하는 역할
- Guard는 api 요청이 들어갔을 때 (Controller, Service, Repository) 로직 처리 부분까지 갈 수 있냐 없냐를 결정하게 해주는 요소다.
- Pipe가 적용이 되기 훨씬 전에 Guard가 먼저 적용이 돼서 만약에 Guard에서 이번 요청은 들어갈 수가 없어라고 판단을 한다면 파이프까지의 요청이 이어지지도 않는다.
- Guard를 구현하는 것은 Pipe를 구현하는 것과 굉장히 비슷하다.
- Injectable 데코레이터로 데코레이팅하고, CanActivate라는 타입을 implement를 해준다.
코드예시
test.guard.ts
import {
CanActivate,
ExecutionContext,
Injectable,
UnauthorizedException,
} from '@nestjs/common';
@Injectable()
export class TestGuard implements CanActivate {
canActivate(context: ExecutionContext): boolean {
const req = context.switchToHttp().getRequest();
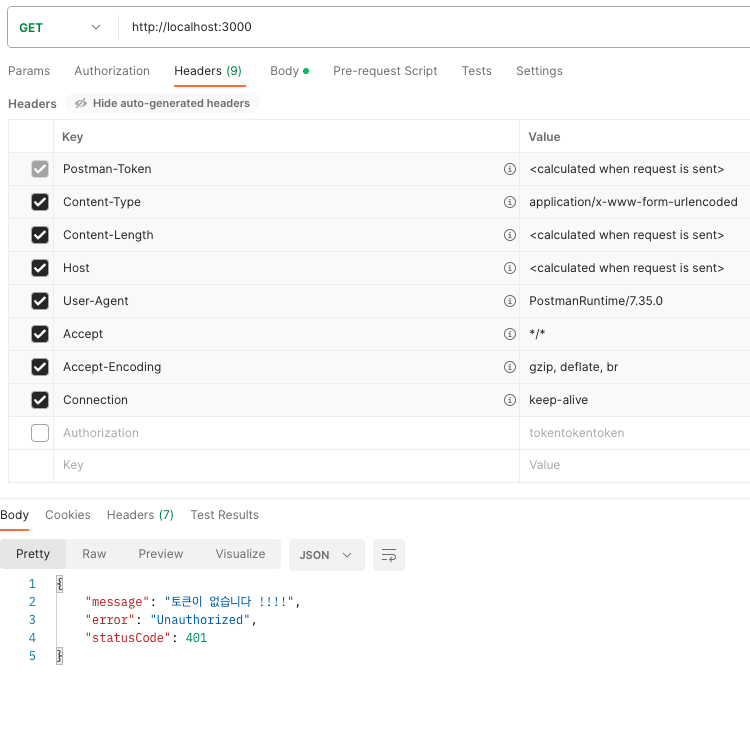
const token = req.headers['authorization'];
if (!token) {
throw new UnauthorizedException('토큰이 없습니다 !!!!');
}
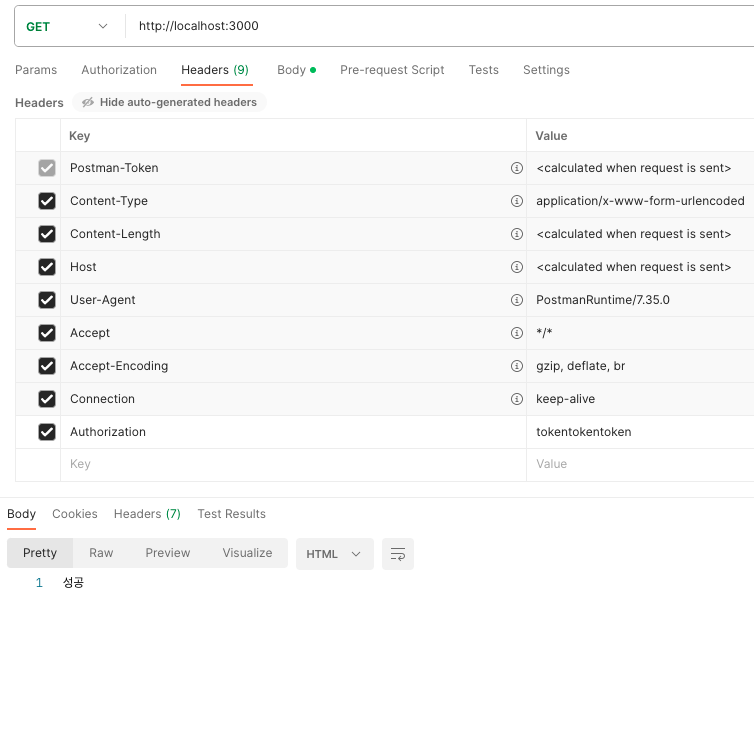
return true;
}
}app.controller.ts
@Controller()
export class AppController {
constructor(private readonly appService: AppService) {}
@Get()
@UsePipes(TestPipe)
@UseGuards(TestGuard)
getHello(@Body() body: Ibody): string {
console.log(body);
return '성공';
}
}결과
- Autorization을 안 넣었을 때
- Autorization을 넣었을 때
Interceptor
- 메서드를 실행하기 전과 후로 우리가 추가 로직을 작성을 할 수가 있다.
- 함수에서 반환된 결과를 우리가 변형할 수 있다.
- 함수에서 던진 에러를 우리가 변형할 수 있다.
- 기본으로 작성해놓은 함수로직에 추가 기능을 넣을 수가 있다.
- 어떤 함수의 기능을 완전히 override할 수가 있다.
- Nestjs 라이프사이클에서 볼 수 있는 모든 기능 중에서 유일하게 요청과 응답을 모두 핸들링할 수 있는 기능이다.
- 또 보통 로그를 쌓는 기능은 Interceptor에서 수행된다.
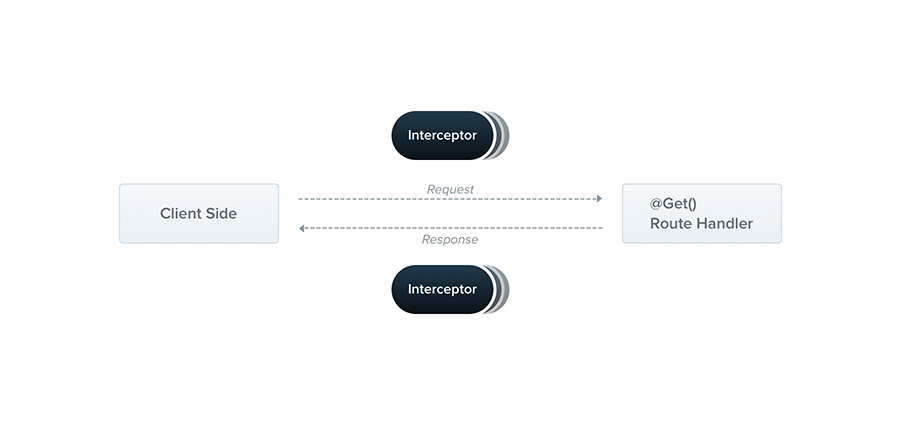
- 위를 보면 Client Side(App, Web or server)가 있다.
- 요청이 들어가서 Route Handler(포스트, 게시글 등등) 여기로 요청이 들어가면 Interceptor가 한 번 Intercepting을 한다.
이 요청을 변경하거나 그대로 둘 수 있다.
- 그다음에 요청이 processing이 되고 Route Handler에서 함수가 실행이 되고 다시 응답으로 Client Side로 보내질 때, 그때 한 번 더 Interceptor가 적용이 된다.
- Request용 Interceptor, Response용 Interceptor를 따로 작성을 하는 게, 아니고 Interceptor 하나에서 이 두 가지를 모두 핸들링할 수 있는 것이 Interceptor의 특장이다.
- ExceptionFilter(예외상황처리라 예외) Interceptor가 유일하게 응답값까지 변경을 할 수 있는 기능이다.
- Interceptor는 Observable이라는 것을 반환하고 Rxjs를 사용한다. 그리고 Injectable 데코레이터로 데코레이팅하고 NestInterceptor를 implement 한다.
코드예시
test.interceptor.ts

import {
    CallHandler,
    ExecutionContext,
    Injectable,
    NestInterceptor,
} from '@nestjs/common';
import { Observable, tap } from 'rxjs';

@Injectable()
export class TestInterceptor implements NestInterceptor {
    intercept(
        context: ExecutionContext,
        next: CallHandler<any>,
    ): Observable<any> {
        const now = new Date();
        console.log(`[REQ] ${now.toLocaleString('kr')}`);
        return next
            .handle()
            .pipe(
                tap((observable) =>
                    console.log(
                        `[RES] ${new Date().toLocaleString('kr')} ${
                            new Date().getMilliseconds() - now.getMilliseconds()
                        }`,
                    ),
                ),
            );
    }
}
app.controller.ts
@Controller()
export class AppController {
constructor(private readonly appService: AppService) {}
@Get()
@UsePipes(TestPipe)
@UseGuards(TestGuard)
@UseInterceptors(TestInterceptor)
getHello(@Body() body: Ibody): string {
return '성공';
}
}결과
[REQ] 12/14/2023, 5:33:51 PM
[RES] 12/14/2023, 5:33:51 PM 4
ExceptionFilter
- ExceptionFilter는 말 그대로 예외를 필터링하는 것이다.
- 예외가 일어났을 때 그 특정 예외를 잡아 가지고 형태를 변경한다던지, 특정 응답을 보내는 등의 여러가지 작업을 할 수가 있다.
- ExceptionFilter는 에러처리에 대한 로깅 로직을 작성하기 좋은 위치에 있다.
- ExceptionFilter는 먼저 Controller, Service, Repository의 로직 처리 후 ExceptionFilter가 적용이 되고 Interceptor로 전달이 된다.
- ExceptionFilter에서 수행한 부분들은 Interceptor에서 마찬가지로 또 추가 처리를 할 수가 있다.
- 클라이언트 사이드에서 요청을 보내고, 요청을 처리하는 부분에서 응답이 돌아갈 때 Filter가 적용이 된다.
코드예시
- ExceptionFilter는 Catch로 데코레이팅이 되고 ExceptionFilter를 implement한다.
test.exceptionFilter.ts

import {
    ArgumentsHost,
    Catch,
    ExceptionFilter,
    HttpException,
} from '@nestjs/common';

@Catch(HttpException)
export class HttpExceptionFilter implements ExceptionFilter {
    catch(exception: HttpException, host: ArgumentsHost) {
        const ctx = host.switchToHttp();
        const response = ctx.getResponse();
        const request = ctx.getRequest();
        const status = exception.getStatus();

        response.status(status).json({
            statusCode: status,
            message: exception.message,
            timestamp: new Date().toLocaleDateString('kr'),
            path: request.url,
        });
    }
}
app.controller.ts
@Controller()
export class AppController {
constructor(private readonly appService: AppService) {}
@Get()
@UsePipes(TestPipe)
@UseGuards(TestGuard)
@UseInterceptors(TestInterceptor)
@UseFilters(HttpExceptionFilter)
getHello(@Body() body: Ibody): string {
throw new BadRequestException('에러라고합니다 !');
return '성공';
}
}결과
“statusCode”: 400
“message”: “에러라고합니다 !”
“timestamp”: “12/14/2023”
“path”: ”/”
- 이렇게 하나의 endpoint에 적용할 수도 있고, 전체에 적용할 수 있습니다.
전체에 ExceptionFilter를 적용하는 코드 예시
main.ts

import { NestFactory } from '@nestjs/core';
import { AppModule } from './app.module';
import { HttpExceptionFilter } from 'src/exception-filter/test.exceptionFilter';

async function bootstrap() {
    const app = await NestFactory.create(AppModule);
    await app.listen(3000);

    app.useGlobalFilters(new HttpExceptionFilter());
}
bootstrap();
Middleware
MiddleWare가 가장 먼저 요청을 받는 역할을 한다.
- 어떤 코드든 실행할 수 있다.
- 요청과 응답 객체의 변화를 우리가 만들어 줄 수 있다. (무언가를 추가하거나 삭제하거나 업데이트가 가능)
- 요청이 끝나기전에 우리가 중간에 중지를 할 수 있다.
- MiddleWare를 원한다면 여러개를 계속 적용을 할 수가 있다.
- 만약에 현재 MiddleWare가 요청 사이클을 중지시키지 않고 에러 같은 것을 던지지 않으면 다음 MiddleWare에다가 요청을 넘기기 위해서 next 함수를 불러야 된다. (안 그러면 그대로 멈춤)
코드예시
test.middleware.ts

import { NestMiddleware } from '@nestjs/common';
import { NextFunction } from 'express';

export class TestMiddleWare implements NestMiddleware {
    use(req: Request, res: Response, next: NextFunction) {
        console.log(
            `[REQ] ${req.url} ${req.method} ${new Date().toLocaleString('kr')}`,
        );
        next();
    }
}- 다른 라이프사이클과 다른 점은 middleware는 modlue에 작성을 한다.
- NestModule를 implements를 하고 path, method로 원하는 값을 받을 수 있다.
app.module.ts

import {
    MiddlewareConsumer,
    Module,
    NestModule,
    RequestMethod,
} from '@nestjs/common';
import { AppController } from './app.controller';
import { AppService } from './app.service';
import { TestMiddleWare } from 'src/middleware/test.middleware';

@Module({
    imports: [],
    controllers: [AppController],
    providers: [AppService],
})
export class AppModule implements NestModule {
    configure(consumer: MiddlewareConsumer) {
        consumer.apply(TestMiddleWare).forRoutes({
            path: '/',
            method: RequestMethod.ALL,
        });
    }
}
결과
[REQ] / GET 12/14/2023, 6:24:48 PM